ScalarLM Benchmarking MI300X Memcpy
This blog covers the performance of the MI300X GPU in the context of a memcpy benchmark.
Here are the specs of the MI300X GPU for reference:
- HBM: 192GB HBM3E
- Bandwidth: 5.3 TB/s
- BF16 Compute: 1.3 PFLOP/s
- FP8 Compute: 2.6 PFLOP/s
Memcpy is used to measure the memory bandwidth of the GPU. The benchmark is run using a simple memcpy kernel that copies data from one location to another in the GPU’s memory. Memcpy is a good indicator of memory bound kernels, which are common in the activation functions of LLMs.
Benchmark Results
This figure plots memcpy bandwidth against the size of the data being copied. The x-axis is the size of the data being copied in bytes, and the y-axis is the bandwidth in GB/s. The data is copied from one location to another in the GPU’s memory. The benchmark is run for different sizes of data, ranging from 4KB to 2.1GB, which is the size of the embedding tables in the Llama 3 8B model.
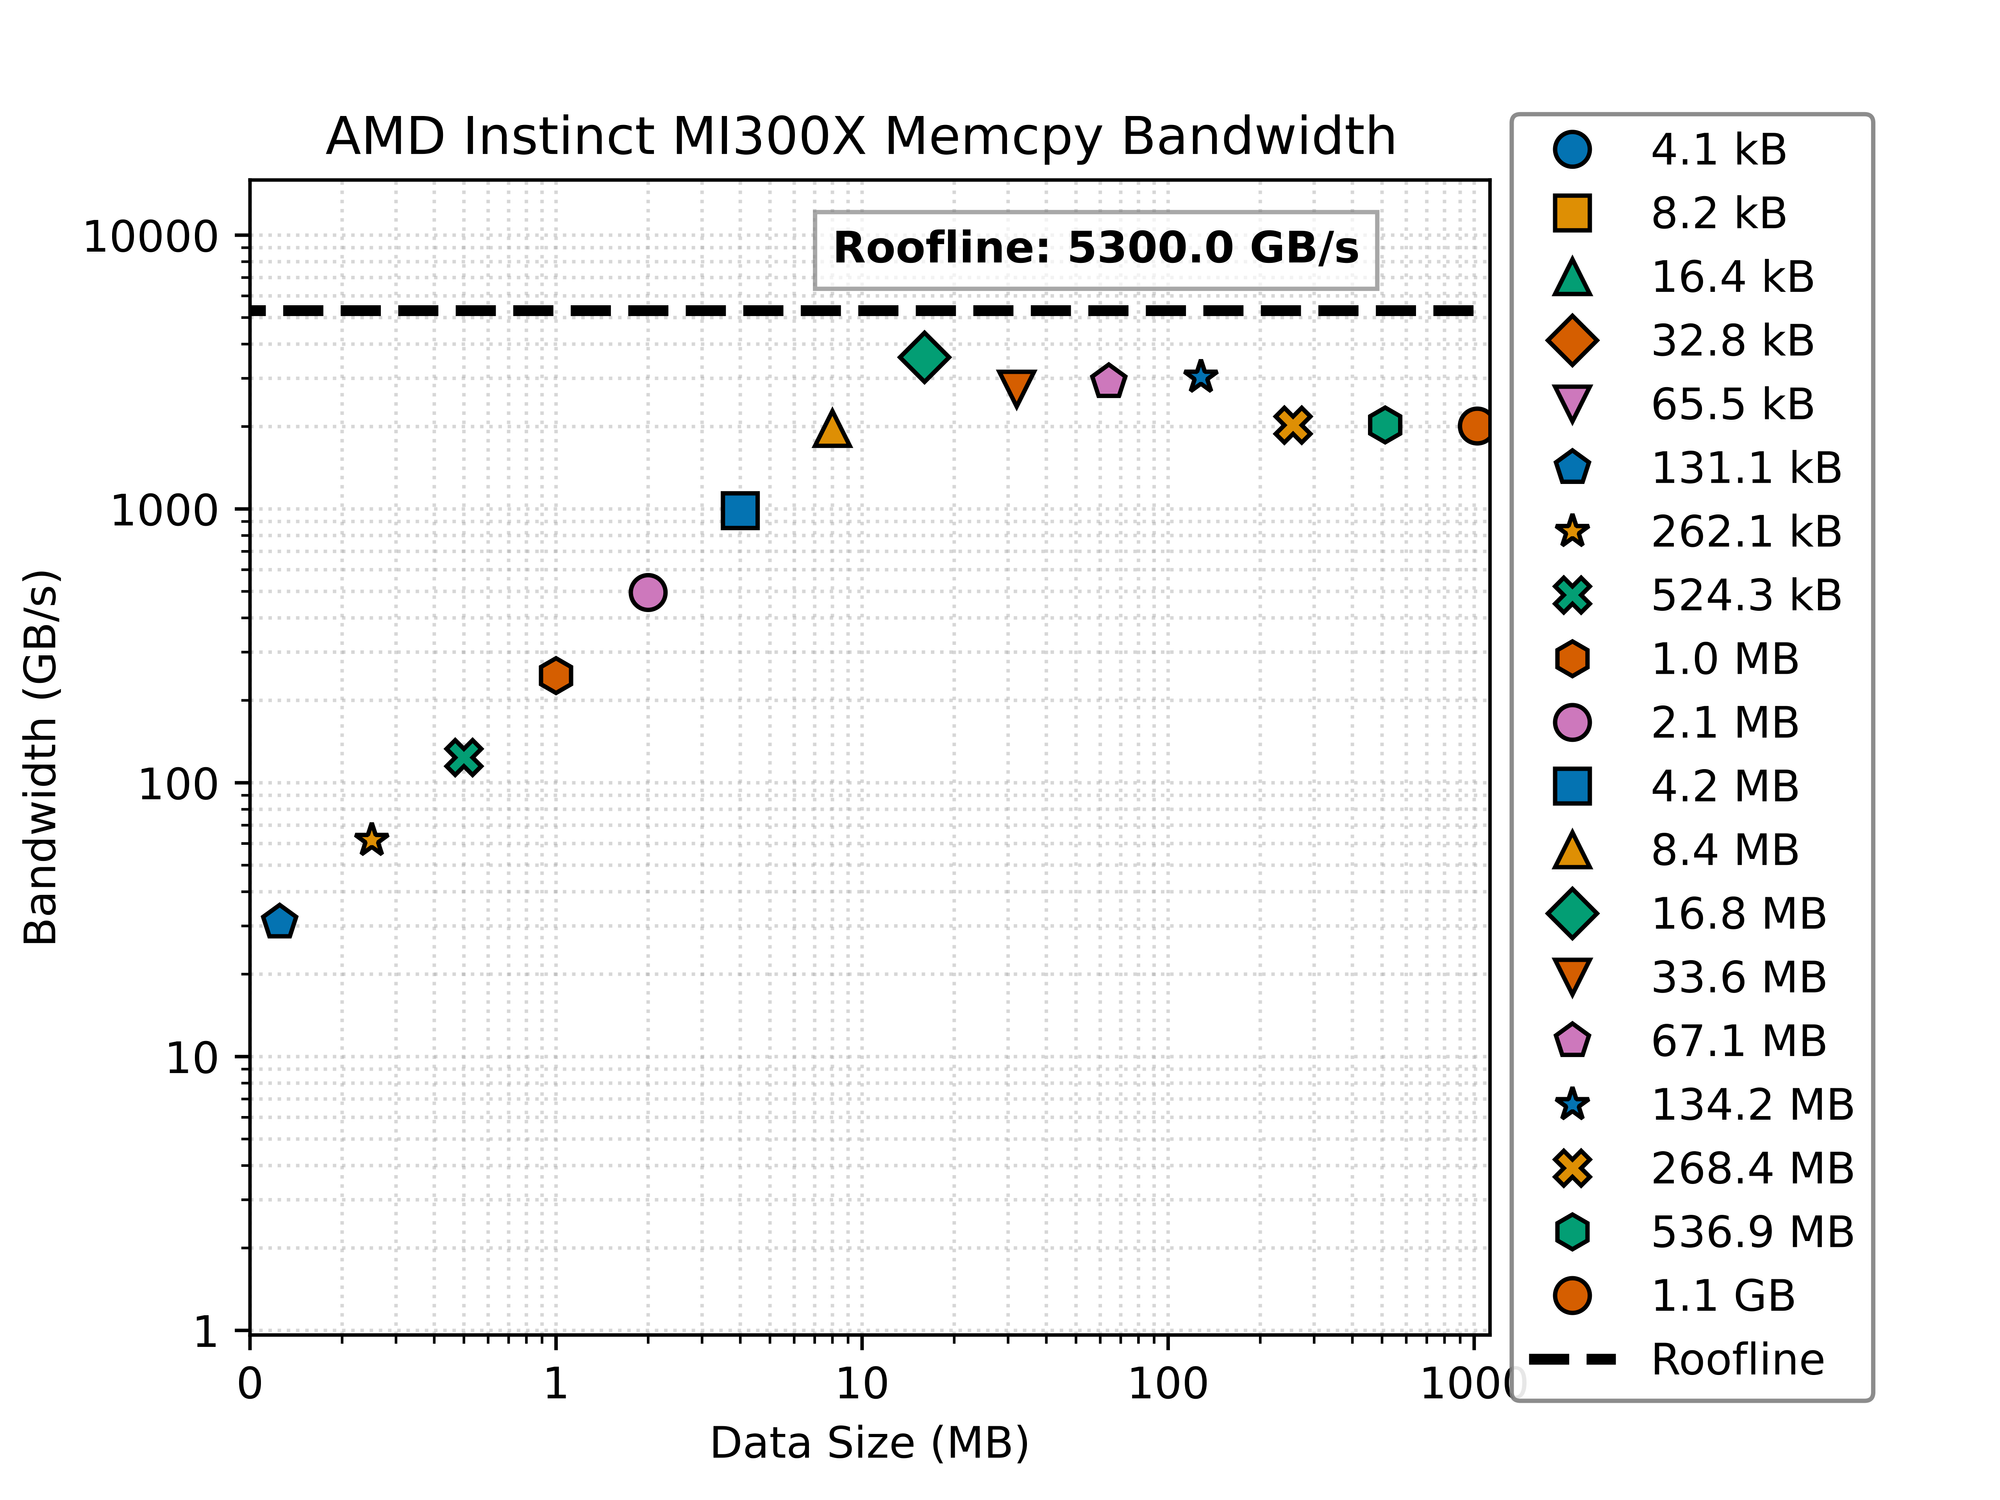
Looking at this graph showing the AMD Instinct MI300X memory bandwidth for different data sizes, let’s analyze what’s happening with the memcpy performance: The graph plots memory bandwidth (GB/s) on the y-axis against data size (MB) on the x-axis, both on logarithmic scales. Here are the key observations:
- Roofline Performance: There’s a horizontal dashed line at approximately 5300 GB/s labeled as “Roofline” - this represents the theoretical maximum memory bandwidth of the MI300X GPU.
- Bandwidth Scaling: The graph shows how memory bandwidth scales with data size:
- For very small data sizes (below 1MB), the bandwidth is quite low (under 100 GB/s)
- As data size increases, bandwidth improves dramatically
- Performance peaks for data sizes around 10-100MB, approaching but not quite reaching the roofline
- Performance Plateau: For data sizes larger than about 10MB, the bandwidth levels off at approximately 2000-3000 GB/s, which is about 40-60% of the theoretical maximum.
- Various Transfer Sizes: The different markers represent different copy sizes (from 4.1kB to 1.1GB), showing how each performs across the spectrum.
- Memory Hierarchy Effects: The shape of this curve is typical of memory systems with hierarchical caches:
- Small transfers are limited by overhead and latency
- Medium-sized transfers achieve the best bandwidth utilization
- Very large transfers may be hitting memory management limitations
This benchmark reveals that while the MI300X offers impressive memory bandwidth, real-world memcpy operations in PyTorch achieve around half of the theoretical maximum, which is actually quite good for practical workloads. The performance characteristics suggest that for optimal memory throughput, data should be processed in chunks of approximately 10-100MB when possible.
Benchmark Code
You can find the benchmark code on the ScalarLM Github.
Let’s take a look at the code:
Memcpy Sizes
# List of memcpy sizes, in bytes, should be multiples of the page size
# Go up to the tensor size used in Llama 3 (4096 * 128256 * 4) = 2_101_346_304
memcpy_sizes = [ 2 ** i for i in range(12, 64) if 2 ** i <= 2_101_346_304 ]
This code sets up the sizes of the data to be copied. The sizes are powers of 2, starting from 4KB (2^12) and going up to 1.1GB (2^30). The sizes are chosen to be multiples of the page size, which is 4KB on most systems. The maximum size is the size of the embedding tables in the Llama 3 8B model, which is 2_101_346_304 bytes (or 2.1GB). The benchmark is run for each of these sizes, and the bandwidth is measured for each size. The results are plotted in the figure above.
Benchmark Setup
Next, we set up the benchmark:
def run_memcpy_benchmark():

    warmup()

    results = {}

    for size in tqdm(memcpy_sizes):
        results[size] = run_memcpy(size)

    return results
This function runs the memcpy benchmark. It first warms up the GPU by running a few iterations of the memcpy kernel without measuring the time. This is done to ensure that the GPU is in a good state before running the benchmark. The function then runs the memcpy kernel for each size in the memcpy_sizes list and measures the time taken to copy the data.
Warmup
Warmup is pretty simple.
def warmup():
    run_memcpy(4096)
This function runs the memcpy kernel with a size of 4KB (4096 bytes) to warm up the GPU. GPUs have startup times to load the code, ramp up the clocks, etc. Running benchmarks without a warmup can lead to misleading results.
Running Memcpy
The run_memcpy function is where the actual memcpy kernel is run. It uses PyTorch to allocate memory on the GPU and copy data from one location to another. The function measures the time taken to copy the data and calculates the bandwidth and other metrics.
The memcpy kernel is run for at least 1 second to get a good measurement of the bandwidth. The function uses PyTorch’s copy_ method to copy data from one tensor to another. copy_ is the in-place version of the copy method, which means that it modifies the destination tensor in place. This is more efficient than creating a new tensor for the result because it avoids allocating memory for the result tensor.
def run_memcpy(size):
    a = torch.zeros(size // 4, device=get_device(), dtype=torch.float32) # size is in bytes, so divide by 4 to get number of floats
    b = torch.zeros(size // 4, device=get_device(), dtype=torch.float32)

    # copy for at least 1 second
    barrier()

    start = get_event()
    end = get_event()

    start_time = time.time()

    start.record()
    iterations = 0
    while time.time() - start_time < 1:
        b.copy_(a)
        iterations += 1
    end.record()

    barrier()
    total_time = start.elapsed_time(end) * 1e-3 / iterations

    return {
        "operational_intensity": 1 / 4,  # 1 FLOP per 4 bytes
        "flop/s": size / 4 / total_time,
        "bytes": size,
        "time": total_time,
        "iterations": iterations,
        "bandwidth": size / total_time,
        "GB/s": size / total_time / 1e9,
    }
Handling GPUs
When running on a GPU, the benchmark uses PyTorch’s CUDA events to measure the time taken to copy the data. CUDA events are used to measure the time taken to execute a kernel on the GPU. The record method is used to record the time at which the event is recorded. The elapsed_time method is used to calculate the time taken to execute the kernel. The time is measured in milliseconds, so we multiply by 1e-3 to convert to seconds. Using events is necessary because the GPU is asynchronous, meaning that the CPU and GPU can run in parallel. The CPU can continue executing while the GPU is copying data. This can lead to misleading results if the time taken to copy the data is not measured correctly.
In order to make the code cross-platform, we define a get_event function that returns a CUDA event if the GPU is available, or a CPU event if the GPU is not available. The CPU event is a simple wrapper around the time module that records the time when the event is created and calculates the elapsed time between two events.
class CPUEvent:
    def __init__(self):
        self.time = 0

    def record(self):
        self.time = time.time()

    def elapsed_time(self, other):
        return (other.time - self.time) * 1000


def get_event():
    if torch.cuda.is_available():
        return torch.cuda.Event(enable_timing=True)
    else:
        return CPUEvent()


def barrier():
    if torch.cuda.is_available():
        torch.cuda.synchronize()
    else:
        pass

def get_device():
    if torch.cuda.is_available():
        return torch.device("cuda:0")
    else:
        return torch.device("cpu")
Benchmark Environment
The benchmark code is simple because it is built on top of ScalarLM, which includes a unified Dockerfile containing the entire platform.
https://github.com/tensorwavecloud/ScalarLM/blob/main/Dockerfile
In order to build a ScalarLM container, checkout the code and build it with Docker:
git clone https://github.com/tensorwavecloud/ScalarLM.git scalarlm
cd scalarlm
./scalarlm build-image amd
Once there, you can run the image and run the benchmark code inside of it.